First up, one of my favorite pieces in the entire living room...

Originally I wasn't going to have anything on this wall at all. Brad ended up running some wires from the cable jack behind it to our outdoor TV (right on the other side of the wall) and they needed to be hidden, so I had to come up with something.
Then I stumbled across this gorgeous cabinet from Shanty 2 Chic:
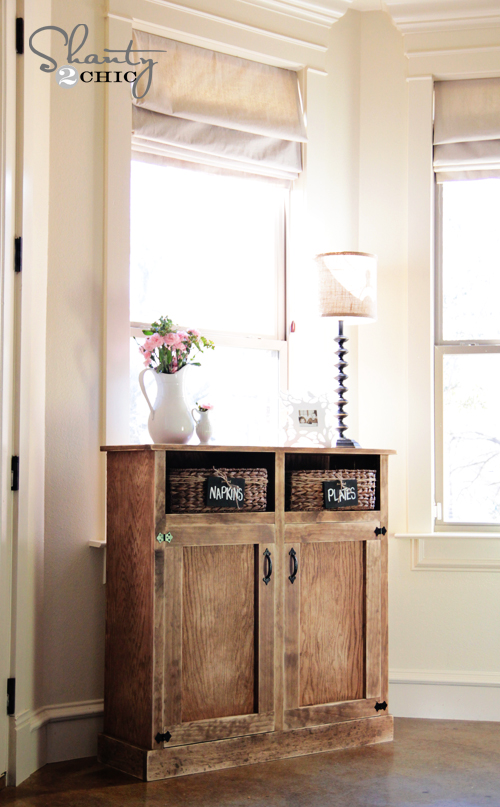
I loved the simple styling and the fact that it was narrow, and the perfect size! The plans seemed easy enough too (I followed the instructions from Ana White as well as referenced the photos from Shanty 2 Chic).
The stained wood she used turned out gorgeous but I realized that all of the furniture I had in the room was wood/brown so I decided to switch it up and go with a warm gray. I've had trouble in the past choosing grays—they always turn out bluer than expected, so this time I went with a much warmer shade—Valspar's Mountain Smoke:

It actually looks pretty cool in this photo but next to all of the other gray swatches, it was a very muddy shade with brown/green undertones. It really is the perfect gray, I think.
Whitney had ripped down a sheet of 3/4" Purebond plywood for the main frame, which isn't available at Lowe's, but since I wasn't staining mine I used a sheet of 3/4 MDF instead. Best choice EVER. MDF is so easy to work with—doesn't splinter or crack and it's super smooth which makes it perfect for painting.
I had Lowe's rip it down into strips to make it easier to transport, but their measurements weren't perfect (as usual) so I ended up having to rip it down on our table saw (I don't know what I'd do without that thing!)
I won't get into the step by step details since you can find those in the links I posted above, but here's some photos during the process. This project calls for a Kreg Jig which I've had some trouble with in the past (mostly with the wood splintering and the screws poking all the way through) but it worked like a charm this time—great for MDF:

The plans aren't super detailed—like it doesn't say what order to assemble the main cabinet pieces in, so Brad and I just assumed it didn't matter.

First pieces up!

This is where more detailed instructions would have come in handy (or perhaps common sense on our part) because after adding the shelves in we realized we couldn't fit our drill in there to secure the top. Oops.

We had to improvise with hand held screwdrivers. It's solid.

There were also a couple conflicting measurements on the cut list which set us back but luckily I had leftover scraps of wood I was able to make work.
The doors were the easiest part:

I decided to add a bit of cottage flair by swapping out the plain plywood sheets with beadboard:

Once the frame was assembled we attached the back. I still had some particleboard leftover from our bedroom wall panel project so I was able to save some cash by using that up:

Then it was time to add the trim!

I lied about the doors being the easiest part, this step actually was. No mitering involved!
After patching all of the holes and a good sanding, it was ready for paint:

I've said this before and I'll say it again—Valspar Signature is where it's at. Best paint I've ever used.

And it's a match made in heaven with MDF... one thick coat is all this baby needed (the pine trim and beadboard needed another coat).

After the paint dried, I applied a coat of Minwax finishing paste for protection (it's a wax that I think is meant for stained/bare wood but it was perfect for this project—easier than brushing on poly).
I loved the hardware Whitney used in the original build and I was able to find the hinges at Lowe's (in gold, I spray painted them black) and I grabbed some rustic looking black handles from there as well.

I found the perfect sized baskets at the Container Store, which arrived just in time for the photo shoot.

Next up... the tree stump table.

This project caused a bit of headaches.
I've wanted to make one forever and I knew it would be perfect in the living room. Fortunately we have tons of chopped trees leftover from their removal earlier this year:

I picked out my favorite log and had my dad come over with his chainsaw to help cut it.

The cut didn't end up being exactly straight, and his chainsaw broke mid-way through so I was left with a crooked log that was borderline too short and very uneven.
Fortunately I just happened to buy a planer a couple months ago at our local flea market so I could finish the job with that. Oh, and this was less than two days before the photo shoot. My dad just got his chainsaw back from the repair shop that day—Brad had broken it trying to cut down the first tree stump table last month. Apparently this chainsaw was determined to not let me have my table.
I spent a solid hour in the garage that night trying to plane it down and get everything level, which ended up mostly just taking another 1-2" off the height.
Then it was time for the bark removal. These logs had been sitting outside for months with no rain so I figured it would peel right off. Well, maybe 6 inches peeled off without a problem and the rest was completely stuck on. I guess if there are other logs on top of it, it won't dry out.
There was no way I'd be able to remove it all before the shoot so I had the stylist hide the removed bark side and shoot it as is...

Oh well.
A few days later I returned with a chisel and hammer and slowly started chipping away...

It was definitely a pain. If you plan on making one in the future, put your stump somewhere dry and let it sit for a few months before even attempting to remove the bark.

Finally I managed to get every last piece off. It wasn't perfect, but I gave it a quick sanding and called it a day.

To address the height issue, and also make it mobile and allow for air circulation at the bottom (which I read was recommended) I added some small casters purchased from Lowe's:

I skipped the poly and am leaving it natural for now.

I love it, so it was definitely worth it in the end.

And if you're curious about this white sofa slipcovers above... here's what happened. Remember my post back in July asking for your thoughts what to do with the living room arrangement?

And then I decided on this layout, but wasn't sure what to do with the couch fabric...

We still had the kivik slipcovers from our last house—which I loved at the time, but this home is definitely not the same beachy style. I loved the quality and fitment though, so it was an easy decision to go with Comfort Works again.
I tossed around the idea of white and gray, but figured I'd wait until the actual fabric swatches came in the mail to make a final decision.
White has always been my favorite color for sofas, but I've been too scared to take the plunge (hello, stains) so I just wrote it off completely. But then I discovered Comfort Works recently came out with a new "stain resistant" fabric called Liege, so I ordered a sample in "Eggshell" which reads as white but it's really an off-white oatmeal linen blend up close.

I absolutely loved it. I was still skeptical about it's stain-repelling effectiveness so I put it to the test with some red wine...
 |
| Yes, I wasted good red wine for this test. |
Literally... the wine just fell off of it like it was never even there. It was like Scotch Guard on crack. I have no idea how it was possible but I immediately showed Brad (the OCD clean freak) and convinced him to let me buy my white slipcovers. Forget the gray, I want all white.
They even make custom sofa covers so I was able to get one for my armchair. I just had to send them photos and fill out a measurement form and their team did the rest.

Fun fact... Brad and I bought this chair on Craigslist for $35 back when we lived in LA (almost 8 years ago, where does the time go?!) Here it is way back when...

I could choose whatever style I wanted so I sent them some of my favorites I'd been collecting on Pinterest...
 |
| Pin |
 |
| Pin |
 |
| Pin |
 |
| Pin |
Relaxed/loose fit with piping and pleated corners... perfect.
The covers arrived over a month ago but I waited until just before the shoot to swap them out so they were nice and fresh.

I think they nailed it and I really couldn't be happier.

Now I'm just crossing my fingers the stain resistance will last forever! The good news is, the cushions are reversible so if there is a catastrophe, I can simply flip it over to the other side. The other good news is because I opted for the loose fit, the covers are easily removable to throw in the wash so it shouldn't be a huge pain when they need a cleaning.
Whew, alright, that's enough information crammed into one post! Mark your calendars for Monday where I'll be sharing all of the sources for this living room (and if you don't want to miss anything in the meantime, feel free to follow along on instagram!)

0 comments:
Post a Comment